OAuth Integration Guide for eCourtDate
What is eCourtDate?
eCourtDate is a cloud-native communications platform used by justice systems such as courts and prosecutors. Agencies can automatically send and receive two-way messages via texts (SMS), email, and voice calls.
eCourtDate Agency Required
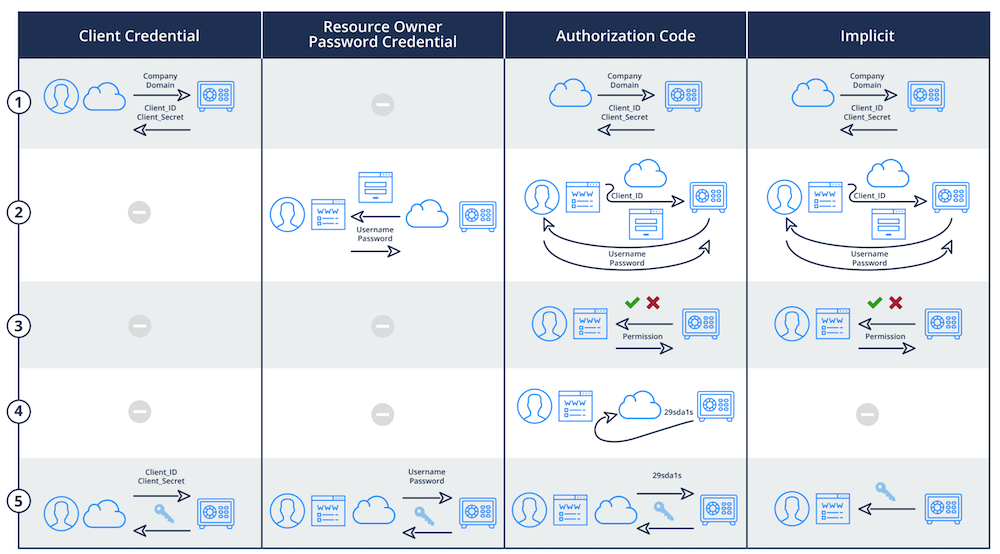
Understanding OAuth 2.0
OAuth 2.0 is an open standard for access delegation, widely used for Internet users to grant websites or applications access to their information on other websites without giving them passwords. It separates the role of a user from that of a client, allowing the client to act on behalf of the user without sharing their credentials.
OAuth 2.0 operates through a series of handshakes involving various tokens. The basic steps include:
1. The client (an application requiring access) requests authorization from the resource owner (typically, the user).
2. If the user consents, the client receives an authorization grant, which it exchanges for an access token at the authorization server.
3. The client then uses the access token to access the protected resources from the resource server.
Advantages of OAuth 2.0 Over SSO
While SSO offers an easier login process, reducing password fatigue and potentially lowering support costs related to password recovery, OAuth 2.0 brings in several distinct advantages:
1. Scoped Access: OAuth 2.0 permits scoped access, which means applications don't get full access to a user's account. They only receive limited, often read-only, access to the user's data. This is a significant advantage in terms of privacy and security.
2. No Shared Credentials: OAuth 2.0 doesn't require sharing the user's credentials with the client, which is a key security enhancement. The risk of a user's password being compromised is substantially reduced.
3. Delegation: OAuth 2.0 supports delegation, where a resource owner can delegate access to a client, which can act on behalf of the owner without impersonation. This is crucial for modern API-driven applications.
4. Revocable Access: OAuth 2.0 access tokens can be revoked by users at any time, providing better control over which applications have ongoing access to their data.
5. Standardization: OAuth 2.0 is a standardized protocol adopted widely across industries, including major players like Google, Facebook, and Microsoft. This standardization makes integration smoother and helps in staying up-to-date with security best practices.
Choosing OAuth 2.0 as your primary authentication method means embracing a secure, flexible, and modern approach to managing user access. Its capability of providing scoped and revocable access, coupled with delegation, and without sharing credentials, makes it a robust choice for any organization prioritizing security. While SSO still has its place, OAuth 2.0 represents a significant step forward in secure user authentication for government SaaS users.
CISA Guidelines
"Open ID Connect, OAuth 2.0, Kerberos, and SAML 2.0 are examples of protocols that use secure, non-password-based connections for SSO. Many social media-based SSO services that consumers use are based on Open ID Connect, allowing even consumers to use SSO while focusing on strong authentication for their primary login provider."
Read CISA's guide on Implementing Strong Authentication Here.
Getting Started
IDP Management is designed to integrate with any compliant OAuth 2.0-based Identity Provider, such as Microsoft's Azure Active Directory and Google's Business Workspace.
You will need administrator-level access to an IDP service to use this guide. We recommend using a test environment with a staging agency in eCourtDate.
One IDP profile can authorize users to multiple agencies based on group or role memberships in your IDP.
Each IDP profile can only authorize users in the same region.
Step 1 - Create an IDP Profile
- Log in to the eCourtDate Console at console.ecourtdate.com.
- Click on the IDPs link in the top navigation.
- Choose your desired customer from the top left customer switcher.
- Click on Add IDP.
- Choose your desired region and click Add.
- You will be automatically redirected to edit the new IDP.
Step 2 - Configure your Identity Provider
Azure
Follow these steps to set up Azure Active Directory as an Identity Provider:
-
Access Azure Portal
- Go to portal.azure.com
- Navigate to Azure Active Directory
- Select your tenant or create a new one
-
Create App Registration
- Go to "App registrations"
- Click "New registration"
- Configure the application:
- Name: "eCourtDate" (or your preferred name)
- Supported account types: "Accounts in this organizational directory only"
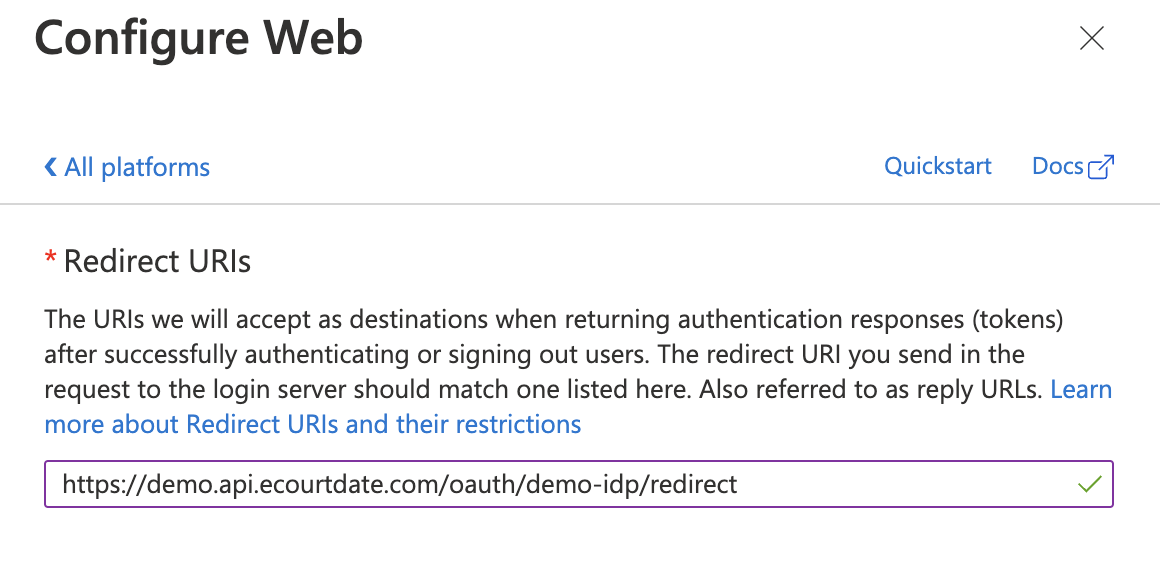
- Platform configuration: Select "Web"
- Redirect URI:
https://{region}.api.ecourtdate.com/oauth/{yoursignin}/redirect
-
Configure Authentication
- Click on the "Authentication" tab
- Under "Platform configurations":
- Add the Redirect URI from eCourtDate Console
- Add Front-channel logout URL from Console
- Enable "Access tokens"
- Enable "ID tokens"
-
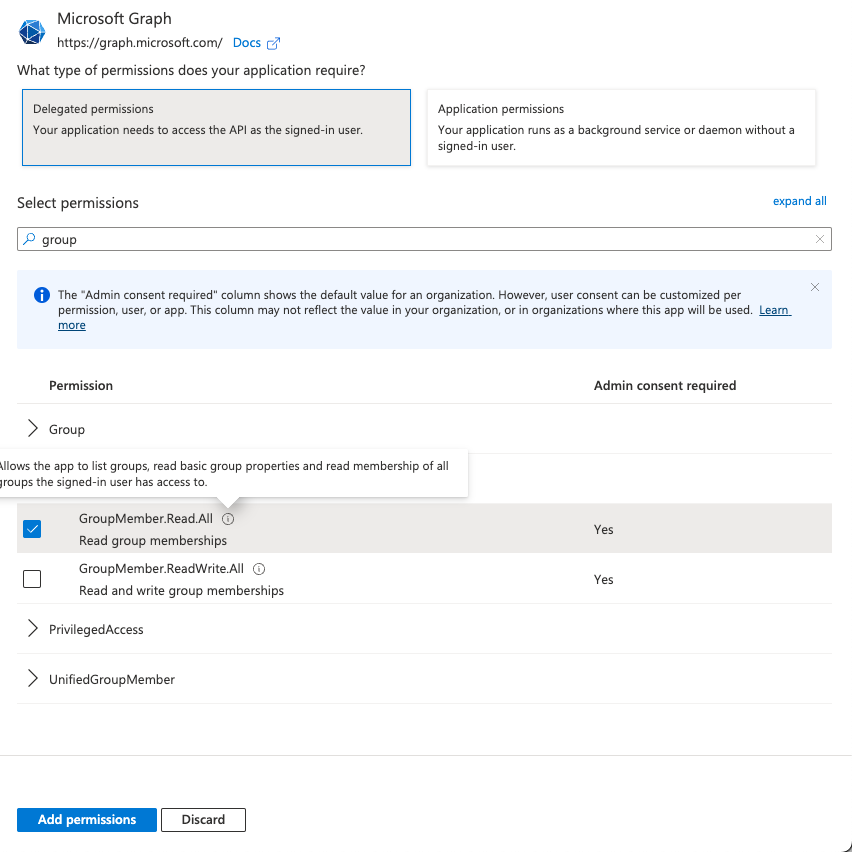
Configure API Permissions
- Click on "API permissions" tab
- Add these permissions:
- Microsoft Graph > GroupMember.Read.All (for group-based access)
- Microsoft Graph > User.Read (default)
- Click "Grant admin consent" for your directory
-
Configure Token Settings
- Go to "Token configuration"
- Enable "Group claims" if using Azure Groups for role assignment
- Select "Security groups" under group claims type

-
Get Client Credentials
- Go to "Certificates & secrets" tab
- Create a new client secret
- Copy and save the secret value immediately (it won't be shown again)
- Note the Client ID from the "Overview" tab
-
Configure eCourtDate Console
- Use these URLs in your IDP configuration:
- Well Known URL:
https://login.microsoftonline.com/{your-tenant-id}/v2.0/.well-known/openid-configuration - Base URL:
https://login.microsoftonline.com/{your-tenant-id} - Authorization URL:
https://login.microsoftonline.com/{your-tenant-id}/oauth2/v2.0/authorize - Token URL:
https://login.microsoftonline.com/{your-tenant-id}/oauth2/v2.0/token - User URL:
https://graph.microsoft.com/oidc/userinfo - End Session URL:
https://login.microsoftonline.com/{your-tenant-id}/oauth2/v2.0/logout - Enter your Client ID and Client Secret from step 6
- Well Known URL:
- Use these URLs in your IDP configuration:
- Create Azure AD Security Groups that match your eCourtDate role names
- For agency-specific roles, use the format: {AgencyReference_ECOURTDATE}
- Add users to these groups in Azure AD
- Group memberships will sync automatically on user login
- Grant admin consent for the required API permissions
- Save the client secret when it's first created
- Configure appropriate conditional access policies if needed
- Enable MFA if required by your security policies
Follow these steps to set up Google Workspace as an Identity Provider:
-
Access Google Cloud Console
- Go to console.cloud.google.com
- Create a new project or select an existing one
- Click on "APIs & Services"
-
Configure OAuth Consent Screen
- Click "OAuth consent screen"
- Choose User Type:
Internal(recommended for enterprise) - Fill in required fields:
- App name: "eCourtDate" (or your preferred name)
- User support email: Your help desk email
- Application Home Page:
https://ecourtdate.com - Application Privacy Policy:
https://ecourtdate.com/terms-of-use - Application Terms of Service:
https://ecourtdate.com/terms-of-use - Authorized domains:
ecourtdate.com - Developer contact information: Your email
-
Configure OAuth Scopes
- Add these required scopes:
./auth/userinfo.email- For email address./auth/userinfo.profile- For user profile info
- For group membership sync, also add:
https://www.googleapis.com/auth/admin.directory.group.member.readonlyhttps://www.googleapis.com/auth/admin.directory.group.readonly
- Add these required scopes:
-
Create OAuth 2.0 Credentials
- Go to "Credentials" tab
- Click "Create Credentials"
- Select "OAuth Client ID"
- Choose Application Type: "Web Application"
- Set Authorized redirect URI:
https://{region}.api.ecourtdate.com/oauth/{yoursignin}/redirect - Note down the generated Client ID and Client Secret
-
Configure eCourtDate Console
- Use these URLs in your IDP configuration:
- Well Known URL:
https://accounts.google.com/.well-known/openid-configuration - Base URL:
https://accounts.google.com - Authorization URL:
https://accounts.google.com/o/oauth2/v2/auth - Token URL:
https://oauth2.googleapis.com/token - User URL:
https://www.googleapis.com/oauth2/v3/userinfo - End Session URL:
https://accounts.google.com/o/oauth2/revoke - Enter your Client ID and Client Secret from step 4
- Well Known URL:
- Use these URLs in your IDP configuration:
- Create Google Groups that match your eCourtDate role names
- For agency-specific roles, use the format: {AgencyReference_ECOURTDATE}
- Add users to these groups in Google Workspace Admin
- Group memberships will sync automatically on user login
AWS Cognito
Follow these steps to set up AWS Cognito as an Identity Provider:
-
Access AWS Console
- Go to AWS Console or AWS GovCloud Console
- Navigate to Amazon Cognito service
- Select your region
-
Create/Configure User Pool
- Click "Create user pool" (or select existing)
- Choose Cognito user pool sign-in options:
- Enable "Email" as sign-in option
- Configure password policy per your requirements
- Enable Multi-Factor Authentication (MFA) if required
-
Configure App Integration
- Under "App integration", configure:
- App client name (e.g., "eCourtDate-Users")
- Select "Public client" for browser-based authentication
- Generate a client secret
- Set callback URL:
https://{region}.api.ecourtdate.com/oauth/{yoursignin}/redirect - Set sign-out URL if needed
- Under OAuth 2.0 settings:
- Enable "Authorization code grant"
- Enable OpenID Connect scopes:
emailopenidprofile
- Under "App integration", configure:
-
Configure Domain
- Under "App integration" > "Domain":
- Choose "Use Cognito domain" or "Use your own domain"
- If using Cognito domain: Create a domain prefix
- If using custom domain: Configure SSL certificate and DNS records
- Under "App integration" > "Domain":
-
Configure eCourtDate Console
- Use these values in your IDP configuration:
- Well Known URL:
https://cognito-idp.{region}.amazonaws.com/{userPoolId}/.well-known/openid-configuration - Base URL:
https://{domain}.auth.{region}.amazoncognito.com - Authorization URL:
https://{domain}.auth.{region}.amazoncognito.com/oauth2/authorize - Token URL:
https://{domain}.auth.{region}.amazoncognito.com/oauth2/token - User URL:
https://{domain}.auth.{region}.amazoncognito.com/oauth2/userInfo - End Session URL:
https://{domain}.auth.{region}.amazoncognito.com/logout - Client ID: From App client configuration
- Client Secret: From App client configuration
- Well Known URL:
- Use these values in your IDP configuration:
- Create Cognito Groups that match your eCourtDate role names
- For agency-specific roles, use the format: {AgencyReference_ECOURTDATE}
- Add users to these groups in Cognito User Pool
- Group memberships will sync automatically on user login
- Match the AWS region with your eCourtDate region
- Configure appropriate password policies and MFA settings
- Review and enable necessary security features like advanced security options
Okta
Follow these steps to set up Okta as an Identity Provider:
-
Access Okta Admin Console
- Log in to your Okta Admin Console (
https://{your-domain}.okta.com/admin/dashboard) - If using Okta Government, use
https://{your-domain}.oktapreview.com/admin/dashboard
- Log in to your Okta Admin Console (
-
Create OpenID Connect Application
- Go to "Applications" > "Applications"
- Click "Create App Integration"
- Select:
- Sign-in method: "OIDC - OpenID Connect"
- Application type: "Web Application"
-
Configure New Integration
- App integration name: "eCourtDate" (or your preferred name)
- Grant type: Select "Authorization Code"
- Sign-in redirect URIs:
https://{region}.api.ecourtdate.com/oauth/{yoursignin}/redirect - Sign-out redirect URIs: Add your post-logout URL if needed
- Assignments: Select "Skip group assignment for now" (we'll configure this later)
-
Configure API Scopes
- Under "Okta API Scopes", select:
openidemailprofilegroups
- Under "Okta API Scopes", select:
-
Configure Group Claims
- Go to "Directory" > "Groups"
- Create groups matching your eCourtDate roles
- Return to your application settings
- Under "Sign On" tab, find "OpenID Connect Token"
- Add "Groups" claim to ID Token:
- Name: "groups"
- Include in token type: "ID Token"
- Value type: "Groups"
- Filter: Matches regex ".*_ECOURTDATE"
-
Configure eCourtDate Console
- Use these URLs in your IDP configuration:
- Well Known URL:
https://{your-domain}.okta.com/.well-known/openid-configuration - Base URL:
https://{your-domain}.okta.com - Authorization URL:
https://{your-domain}.okta.com/oauth2/v1/authorize - Token URL:
https://{your-domain}.okta.com/oauth2/v1/token - User URL:
https://{your-domain}.okta.com/oauth2/v1/userinfo - End Session URL:
https://{your-domain}.okta.com/oauth2/v1/logout - Client ID: From the "Client Credentials" section
- Client Secret: From the "Client Credentials" section
- Well Known URL:
- Use these URLs in your IDP configuration:
- Create Okta Groups that match your eCourtDate role names
- For agency-specific roles, use the format: {AgencyReference_ECOURTDATE}
- Add users to these groups in Okta
- Group memberships will sync automatically on user login
- Configure appropriate Sign On policies
- Set up Multi-Factor Authentication if required
- Review application sign-on and access policies
- For FedRAMP compliance, ensure you're using Okta Government
- Consider implementing Okta FastPass for passwordless authentication
Custom OAuth 2.0/OpenID Connect Provider
Follow these steps to set up any OAuth 2.0/OpenID Connect compliant Identity Provider:
-
Gather Required Information
- Locate your provider's OAuth 2.0/OpenID Connect configuration documentation
- Required endpoints:
- OpenID Configuration URL (/.well-known/openid-configuration)
- Authorization endpoint
- Token endpoint
- UserInfo endpoint
- End Session (logout) endpoint
-
Register OAuth Application
- In your provider's dashboard/console:
- Create a new OAuth 2.0/OpenID Connect application
- Set application type as "Web Application"
- Configure redirect URI:
https://{region}.api.ecourtdate.com/oauth/{yoursignin}/redirect - Note down the generated Client ID and Client Secret
- In your provider's dashboard/console:
-
Configure Required Scopes
- Enable these OpenID Connect scopes:
openid- Required for OpenID Connectemail- For user's email addressprofile- For user's profile information
- If using group-based access:
- Enable group/role scopes (provider-specific)
- Configure group claims in tokens
- Enable these OpenID Connect scopes:
-
Configure Group Claims (Optional)
- If your provider supports group-based access:
- Create groups matching eCourtDate role names
- Configure group claim in ID Token or UserInfo response
- Ensure group names follow format: {AgencyReference_ECOURTDATE}
- If your provider supports group-based access:
-
Configure eCourtDate Console
- Use these values in your IDP configuration:
- Well Known URL:
https://{your-provider-domain}/.well-known/openid-configuration - Base URL: Your provider's base URL
- Authorization URL: Your provider's authorization endpoint
- Token URL: Your provider's token endpoint
- User URL: Your provider's UserInfo endpoint
- End Session URL: Your provider's logout endpoint
- Client ID: From your OAuth application registration
- Client Secret: From your OAuth application registration
- Well Known URL:
- Use these values in your IDP configuration:
- Must support OAuth 2.0 Authorization Code flow
- Must support OpenID Connect 1.0
- Must provide standard OpenID Connect claims (sub, email, etc.)
- Should support secure token handling (PKCE recommended)
- Should support standard token revocation
- Ensure all endpoints use HTTPS
- Implement appropriate token lifetimes
- Configure secure token signing algorithms (RS256 recommended)
- Enable MFA if required by your security policies
- Implement appropriate session management
- Consider implementing PKCE for enhanced security
- Review provider's security certifications and compliance
- Use OpenID Connect test tools to validate your configuration
- Test with a small user group before full deployment
- Verify group claims are properly formatted
- Test token refresh and revocation flows
- Validate error handling and user experience
Step 3 - Update IDP Profile
Return to the Console IDP profile to configure the following fields based on your IDP:
At this stage, an authorized user in the IDP should be able to sign in to eCourtDate using the Sign-in Link.
If the user does previously exist in eCourtDate, you should expect the user profile to be created and assigned to the Default Agency.
No roles or permissions should be assigned to the user automatically.
Step 4 - Configure Roles and Enabled Agencies
Choose a Default Role to auto-assign an eCourtDate role to any authorized user.
Users will be auto-assigned the Default Agency.
To assign additional agencies, the group name must match the following format (case insensitive): {AgencyReference_ECOURTDATE}.
For example, if your agency reference is: municipal-court-123 then the Azure group name should be municipal-court-123_ECOURTDATE
Prerequisite: the agency must be included in the IDP Enabled Agencies setting to be used for Group -> Agency assignment.
Note: Any Role that is a case-insensitive match to one of the following: SECURITY or ADMIN or ROOT will be assigned Super Admin in addition to any other roles. You may need to enable the Security groups in the above setting.
We appreciate any feedback or suggestions to improve our technical guides and resources.
Popular Enterprise & Government Identity Providers
While this guide focuses on popular enterprise and government identity providers, eCourtDate supports any OAuth 2.0/OpenID Connect compliant provider, including:
- Ping Identity
- Used by many federal agencies
- FedRAMP authorized
- Strong focus on zero trust architecture
- Supports FIDO2 authentication
- ForgeRock
- Popular in government sector
- Strong identity governance features
- Supports complex authentication flows
- On-premises deployment option
- OneLogin
- FedRAMP Ready status
- Strong focus on security compliance
- Extensive directory integration options
- Keycloak
- Open-source option
- Popular for on-premises deployments
- Full control over identity data
- Supports custom authentication flows
- Oracle Identity Cloud Service
- FedRAMP authorized
- Integration with Oracle Cloud Infrastructure
- Strong enterprise features
Key Considerations for Government/Enterprise:
- FedRAMP Authorization status
- On-premises deployment options
- FIPS 140-2 compliance
- PIV/CAC card support
- Multi-factor authentication options
- Audit logging capabilities
- Integration with existing directory services
Technical Support
If you have any questions or issues while using this guide, please contact our support team at help@ecourtdate.com. We're here to help.